

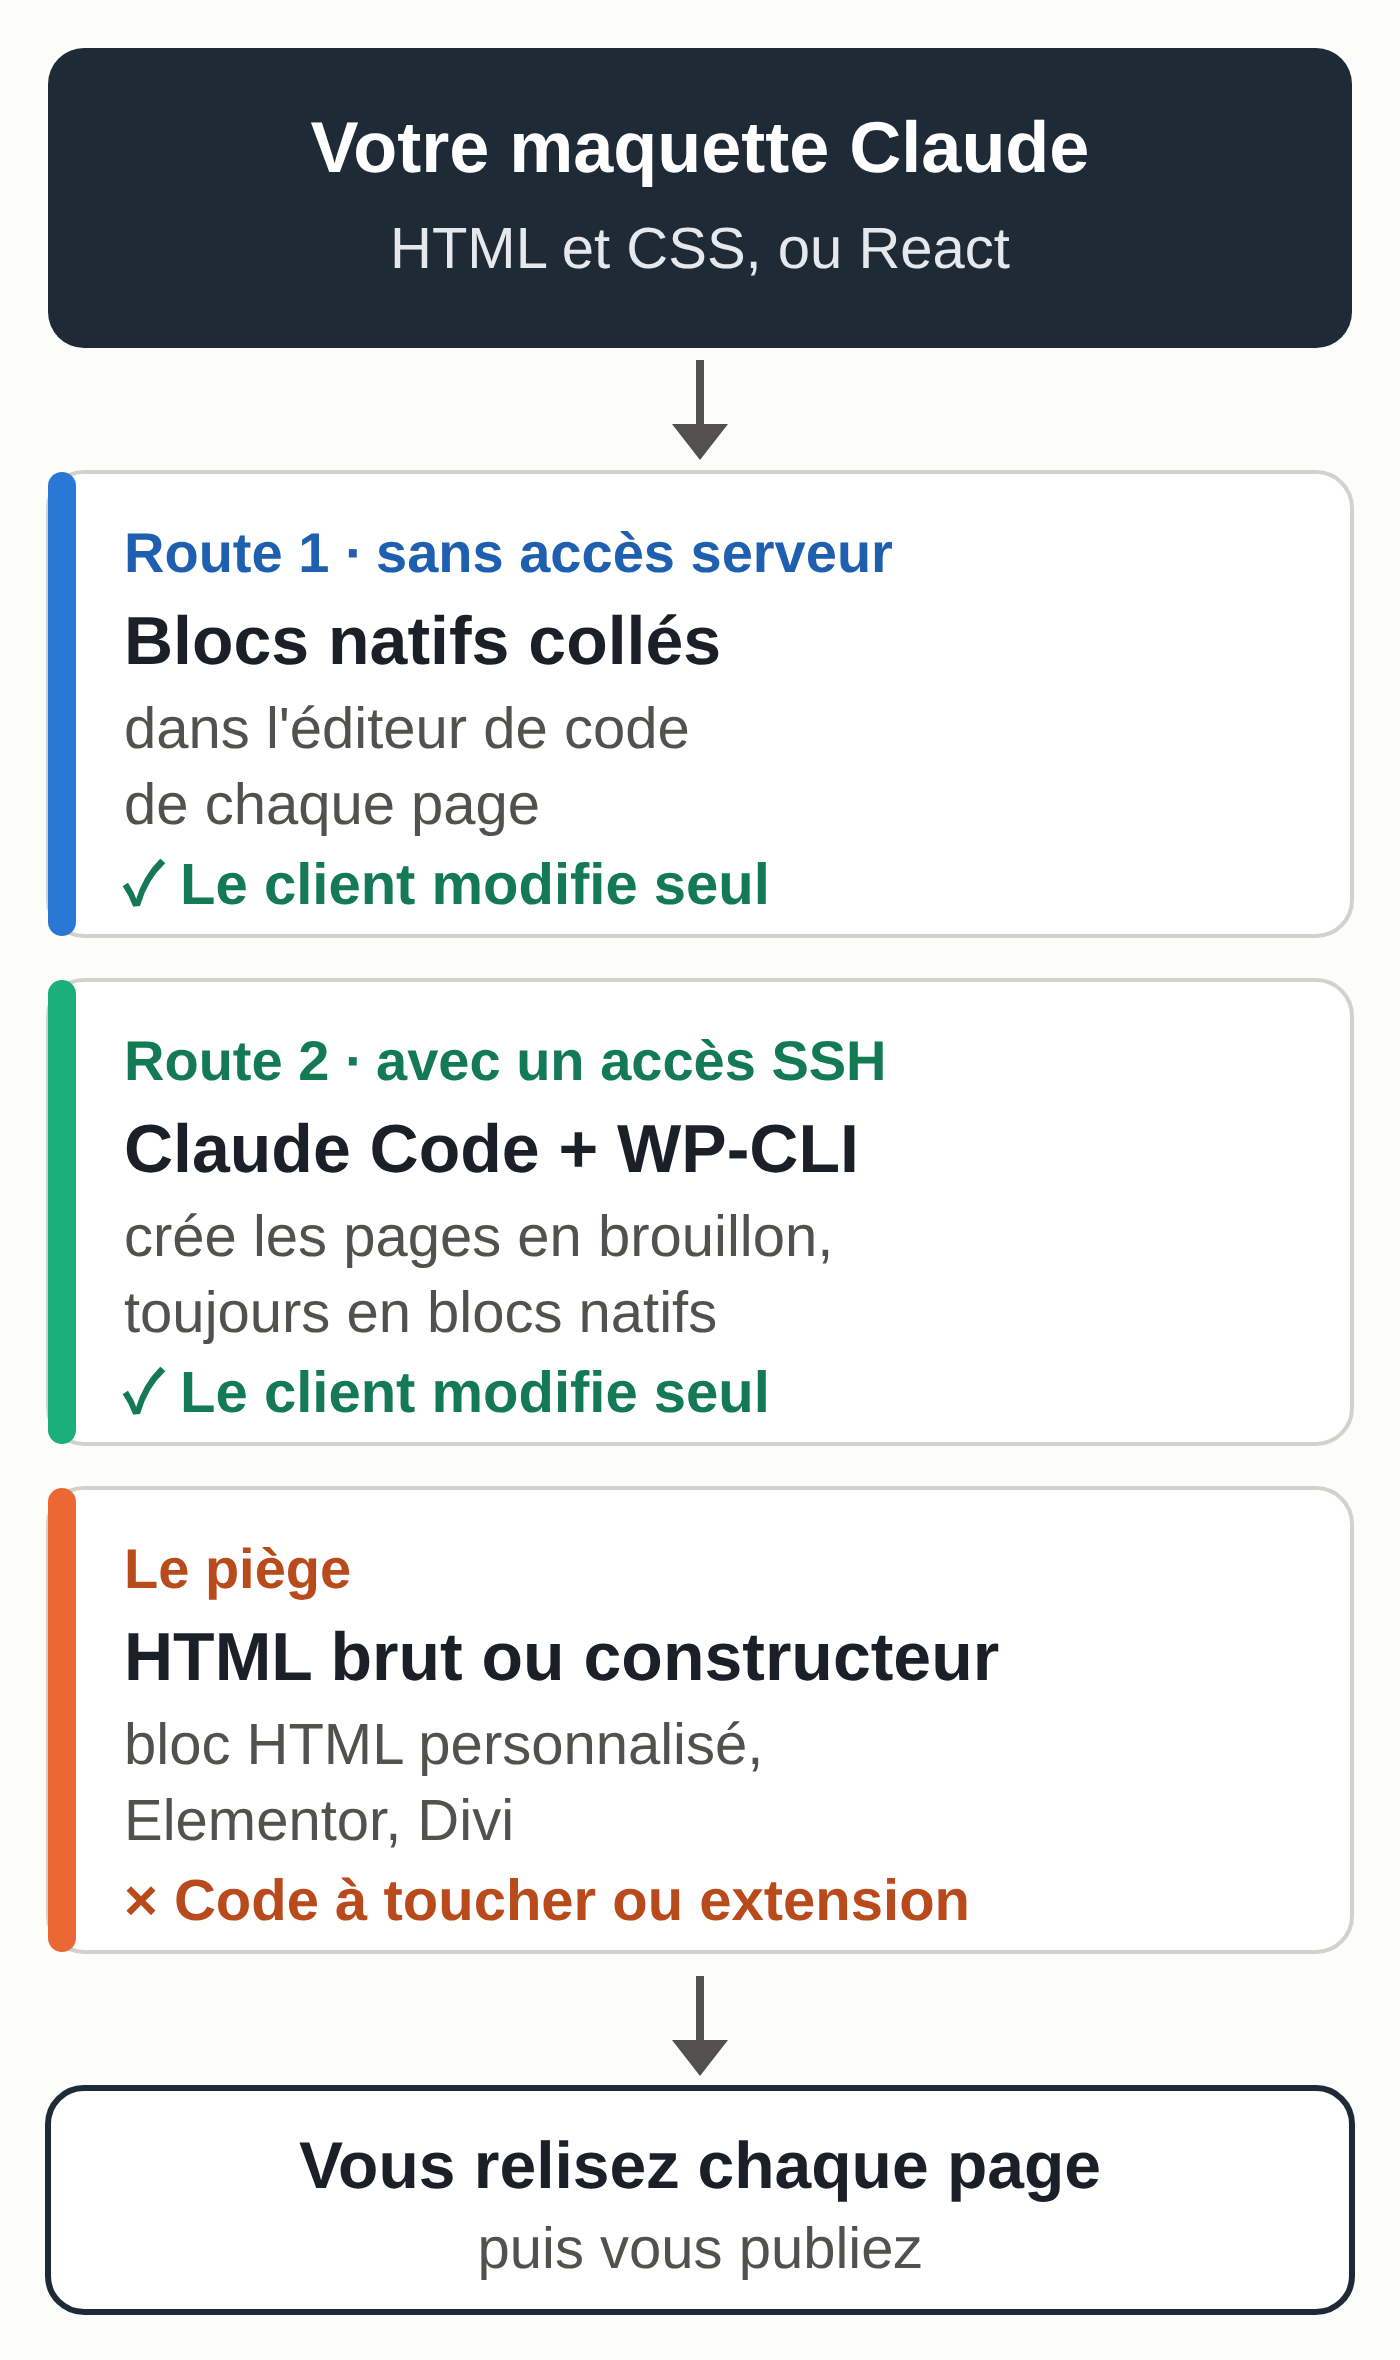
A mockup made in Claude doesn’t go into WordPress through a simple file import. The method that works: ask Claude to rewrite each page as native WordPress blocks, then paste that code into the page’s code editor. Your client can then click on a piece of text to change it and replace a photo in two clicks.
Your hours of work aren’t lost. The site structure, the copy, the order of the sections, the colors and the image choices are the slow part of a redesign, and all of that carries over into WordPress as is.
Why a Claude mockup doesn’t import as is
When Claude creates a mockup, it produces an artifact: a page in HTML and CSS, sometimes a React component. It’s a prototype a browser can display. If the word is new to you, see what a Claude artifact is and how to share it.
WordPress stores a page differently. Each heading, paragraph, image or button is a block, delimited by a comment such as <!-- wp:heading -->. The editor only makes those blocks editable.
Paste the mockup’s raw HTML into a page and you get a single “Classic” block holding the whole page, or a “Custom HTML” block where every comma has to be changed in the code. So the mockup becomes the approved blueprint, which you translate into blocks.
Theme, access and backup before you start
Check three things on the client’s site.
- The theme. If the Appearance menu contains “Editor,” it’s a block theme, like Twenty Twenty-Five, the WordPress default theme. If it only contains “Customize,” it’s a classic theme. Blocks work in both cases; only the global settings (colors, fonts) live in a different place.
- Your account. You need at least permission to create pages. For CSS and theme settings, you need an administrator account.
- The backup. Make a full one (files and database) before the first change, with your host’s tool or your usual backup plugin.
Sample files for this guide, all made up and in French: maquette-accueil.html (zip) (the mockup for an invented florist, Atelier Capucine), prompt-conversion-blocs.txt (zip) (the full prompt) and page-accueil-blocs.html (zip) (the result we got).
Route 1, converting each page to native blocks with no server access
This is the simplest route. You need the mockup, a Claude account and access to the WordPress admin.
The conversion prompt
Open the conversation that holds the mockup, copy the page’s code from the artifact, then send this prompt with the code pasted at the end. Send one page per message: the answer stays short and you check each page.
You are a WordPress developer. I'm giving you the mockup of a page (HTML and
CSS below). Convert it into native WordPress block markup, ready to paste
into the code editor of a WordPress page.

Rules:
1. Use only WordPress core blocks: core/cover,
   core/group, core/columns, core/column, core/heading, core/paragraph,
   core/list, core/list-item, core/image, core/buttons, core/button,
   core/separator, core/spacer.
2. Each block has its opening and closing comment, for example
   <!-- wp:heading --> ... <!-- /wp:heading -->, and contains exactly the
   HTML the WordPress editor saves for that block (wp-block-...
   classes, wp-element-button on button links).
3. Colors and spacing: only through the block's JSON attributes (style,
   backgroundColor, textColor), with the matching inline style.
   No invented CSS classes.
4. Not allowed: the Custom HTML block (core/html), <script>
   and <style> tags, shortcodes, classes that would need an external
   stylesheet.
5. Images: keep the alt text and the URL from the mockup; I'll
   replace the URL with the Media Library one.
6. Text: copy the mockup's text word for word.
7. Reply with a single code block, no explanation. Then, outside
   the code block, list what native blocks don't reproduce
   (effects, fonts, unusual grids).

Mockup:
[paste the page's HTML and CSS here]
The prohibitions matter as much as the rules. A Custom HTML block displays fine, but your client won’t be able to change anything in it without touching code. An invented class has no effect as long as no stylesheet defines it.
If your mockup is in React, first ask Claude for the static HTML and CSS version of each page, then apply this prompt.
If you convert mockups every week, store this prompt in a skill so you don’t have to paste it again: see how to create a Claude skill.
Pasting the result into WordPress
- In the admin, open Pages, then “Add New Page,” and enter the title.
- Switch to the code editor: Options menu (the three dots at the top right), then “Code editor.” Shortcut: Ctrl + Shift + Alt + M on Windows, Shift + Option + Cmd + M on a Mac.
- Paste the code Claude gave you below the title.
- Click “Exit code editor.” The page reappears as blocks.
- Open List View (the “Document Overview” button at the top left): you should see Cover, Group, Columns, Heading, Paragraph and Buttons blocks, and no “Classic” block.
- Look for the message “This block contains unexpected or invalid content.” It shouldn’t appear anywhere.
- Click “Save draft,” then preview in Tablet and Mobile mode.
What was verified for this guide, on October 5, 2026: the sample mockup was converted by a Claude model with this prompt (outside the claude.ai app), then saved as a draft on a French-language WordPress 7.1.2 install and opened in the editor. Result: 30 blocks, all valid, no warnings, all text present. The test page was deleted afterward.
If a block is flagged as invalid
The same test reproduced a typical cause of error: a style written into the HTML that doesn’t match the block’s attributes. A group with a background color in the HTML, but not in its <!-- wp:group --> comment, is rejected by the editor.
There are two fixes. Click “Attempt recovery” on the block, then check that it still looks like the mockup. Or send the block back to Claude with this message: “The WordPress editor rejects this block. Rewrite it so the comment’s attributes and the inline style match exactly.”
Images and CSS
The mockup’s images point to temporary addresses. For each one, select the Image block, click “Replace,” then “Open Media Library” or upload the photo. Fill in the alt text while you’re at it.
The little CSS that blocks don’t cover (a font, a button’s rounded corners) never goes into the page:
- block theme: Appearance > Editor > Styles, then the three-dot menu > “Additional CSS.” First set what exists in Styles (colors, typography, buttons) before writing any CSS;
- classic theme: Appearance > Customize > “Additional CSS.”
These paths were checked in the official WordPress documentation and in the French translation of WordPress 7.1.2.
Route 2, letting Claude Code build the pages over SSH
Claude Code is Claude’s tool that reads files and runs commands. It works in a terminal, in VS Code, in the desktop app and on the web; for this route, use it in a terminal on your computer. It’s included in the paid Pro, Max, Team and Enterprise plans, not in the free plan, and also works with an Anthropic Console account (API billed by usage). To choose a plan, see which Claude subscription to get.
The benefit here: if the client’s hosting provides SSH access, Claude Code can connect to the server and create the pages itself with WP-CLI, the WordPress command-line tool. When the site has many pages, this route saves you from copying and pasting page by page. The result must stay the same as in route 1: native blocks, as drafts.
Does the host provide SSH access?
Checked in each host’s documentation on October 5, 2026:
- o2switch: SSH on shared hosting, after you authorize your IP address in cPanel with the “SSH Authorization” tool (port 22, 5 exceptions in total).
- Hostinger: SSH from the Premium Web plan, not on Single Web; you turn it on from the “SSH Access” page of the dashboard.
- OVHcloud: SSH from the Pro plan, so not on Starter or Perso. In the control panel, Web Cloud > Hosting plans, “FTP-SSH” tab, then “…” > “Modify” on the user and the “FTP, SFTP and SSH” protocol. Server in the format ssh.clusterXXX.hosting.ovh.net, port 22.
- Infomaniak: SSH on web hosting, not on the Starter plan. In the Manager, “FTP / SSH” menu, create an FTP + SSH account; an “SSH Console” also opens in the browser.
Once connected, type wp --info. If the command responds, WP-CLI is available. If not, the WP-CLI documentation explains how to install it in your folder.
Getting ready before you launch Claude Code
- Work on a staging copy if the host offers one. If not, export the database before you start:
wp db export backup-before-redesign.sql. - Use key-based SSH access, never a password pasted into a conversation.
- Create a WordPress user just for the project, with the Editor role:
wp user create integration integration@example.test --role=editor. It can create pages and upload images, but not install plugins or change the theme. - Put the mockup, one file per page and the client’s photos, already renamed, in a folder on your computer. If the client sends you their copy in Google Docs, see how to connect Claude to Gmail, Drive and Calendar.
Never give Claude Code admin access to the production site without a recent backup.
Watch the permission mode. Recent versions of Claude Code start in auto mode: a second model approves commands on your behalf. For this project, start in Manual mode with claude --permission-mode manual, or press Shift + Tab until you read “manual mode on” in the status bar. Claude Code then asks for your approval before every command that does more than read; read those requests instead of accepting everything at once.
The prompt for Claude Code
Launch Claude Code in Manual mode in the project folder and send this prompt. Rule 5 guides Claude; Manual mode is what guarantees you approve each command.
Context: I'm rebuilding a client's WordPress brochure site. The approved
mockup is in this folder (one HTML file per page, photos in
images/). The site is reachable over SSH: account@server, folder www/,
WP-CLI available with the wp command.

Goal: create each page of the mockup on the site, as a draft,
with the WordPress user "integration".

Rules:
1. Convert each page into native WordPress blocks only (cover,
   group, columns, heading, paragraph, list, image, buttons). No Custom
   HTML block, no <script>, no <style>, no invented
   class.
2. Upload the photos with wp media import (title and alt text),
   then replace the mockup's URLs with the Media Library ones.
3. Create the pages with wp post create, --post_type=page,
   --post_status=draft, --user=integration. Never publish.
4. Not allowed: deleting anything, installing or activating a
   plugin or theme, changing a site setting, touching existing
   pages.
5. Before each command on the server, show it to me and wait for my
   approval.
6. At the end, give me the list of pages and images created with their
   IDs.
Here are the commands you’ll see go by, so you can recognize them. The first copies the files to the server; the next ones run on the server, in the site’s folder (Claude Code usually prefixes them with ssh account@server).
scp page-accueil.html images/vitrine.jpg account@server:~/
cd www
wp media import ~/vitrine.jpg --title="Shop window" --alt="Shop window with bouquets" --user=integration --porcelain
wp post create ~/page-accueil.html --post_type=page --post_status=draft --post_title="Home" --user=integration --porcelain
wp post list --post_type=page --post_status=draft
wp post create reads the page content from a file and, with --porcelain, only prints the ID it created. wp media import can also attach the image to a page with --post_id. These options come from the official WP-CLI documentation.
Reviewing what Claude Code did
Open each draft in the editor and repeat the route 1 checks: List View, no invalid blocks, text matching the mockup, mobile preview. You publish yourself, page by page.
Traps that cost you later
The “Custom HTML” block is tempting: you paste the mockup, it displays. But then your client has to edit code to change opening hours, and you’re the one they’ll call.
Page builders like Elementor or Divi work, but you rebuild the mockup by hand, section by section. The site then depends on the plugin (Divi is paid, and a good part of Elementor is in its Pro version), and leaving it later means redoing the pages.
Automatic “HTML to Elementor” converters exist. Their output is fragile: check every section before you rely on them, and plan to rework the layout.
That leaves the advanced option: asking Claude for a complete theme (a theme.json file, templates and a style.css, delivered as a zip) to upload under Appearance > Themes. It works, but that theme becomes yours to maintain with every WordPress update. If you go that way, start from a child theme of Twenty Twenty-Five instead, which keeps getting updates.
Making the client self-sufficient after delivery
The point of the whole method is that the client no longer needs you to change a comma. Prepare four things.
- An account with the Editor role for everyday use. It edits and publishes pages, with no access to plugins or settings. If the client insists on an administrator account, keep the Editor account for day-to-day work anyway.
- Synced patterns for anything that repeats (contact block, opening hours, call-to-action banner): select the blocks, three-dot menu, “Create pattern,” “Synced” option. One edit updates every page. Since WordPress 7.0, according to the official documentation, a pattern inserted in a page is edited in content-only mode: you change the text and images, and the layout is protected from accidental changes.
- Locks on the sections that structure the page: the block’s three-dot menu, “Lock,” then “Lock movement” and “Lock removal.” These locks prevent accidental moves and deletions.
- A twenty-minute training session, on their own page: change some text, replace a photo with “Replace,” add a paragraph, save, preview on mobile, go back with Revisions.
Also explain where the styling lives: in Appearance > Editor > Styles or theme.json for a block theme, in the child theme otherwise. They have no reason to touch it.
The checklist before you say “it’s done”
- Recent backup, and a restore tested at least once.
- Work done on staging, then moved to production.
- Every page checked on desktop, tablet and phone.
- Images compressed, at the right size, with alt text.
- SEO title and meta description for each page filled in in Rank Math or Yoast.
- Old addresses redirected to the new ones if URLs changed during the redesign.
- Forms tested with a real submission, received in the right inbox.
- Legal pages in place: the legal notice (“mentions légales”) in France, the mandatory information in Belgium (including the company number), a privacy policy, cookie management if the site sets cookies.
Where Claude’s conversion stops
The conversion covers page content. It doesn’t handle the navigation menu, the theme’s header and footer, forms (which go through a plugin), plugin settings or the multilingual version. Those are set up in WordPress, by hand or command by command with Claude Code, and checked one by one. Going live itself (domain name, business email address, hosting, backups) is explained in launching a site built with Claude. For choosing a model based on the task, the page on choosing your AI model and organizing several agents gives a testing method.
For following up on client quotes, the step-by-step method is in building an AI agent without coding.
If your problem is more about keeping track of several clients at once (quotes, follow-ups, files received, deadlines), the MACCUS AI assistant takes care of your own admin work: an assistant you use in Telegram, set up and hosted for you, which remembers your files and connects to the tools you choose with us, case by case. It doesn’t build WordPress sites for you.
For other uses by profession, see AI by profession.